Some features are more visible and easy to notice while others are more subtle and less visible but yet at the same they can be just as important. In this weekend’s updated we added two new features (along with other new features) that have been highly requested and are very beneficial but are not nearly as noticeable as some of the other features so we’re taking a moment to showcase them here and in our next email newsletter.
Why are they less noticeable and visible? Because by default the system will operate the same, you have to actively seek them out. For the first you need to make it visible, and for the second you need to turn it off in the Settings. If you do nothing then the software will continue to operate as it has always done with no visible change to you.
Category Type Column

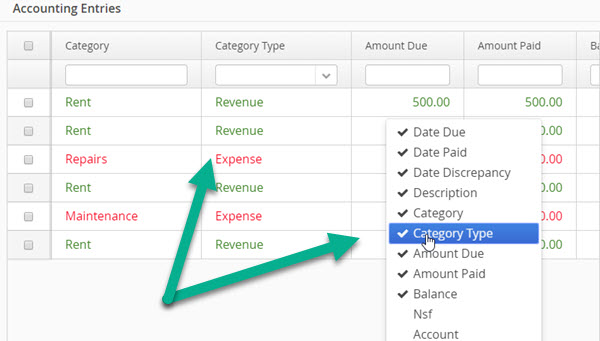
We just added a new column in all the Accounting Entries tables called “Category Type”. This column will display whether an Accounting Entry is a Revenue or an Expense. By default this column is hidden so you need to right click anywhere on the table and select it from the popup context menu to make the column visible as shown above.

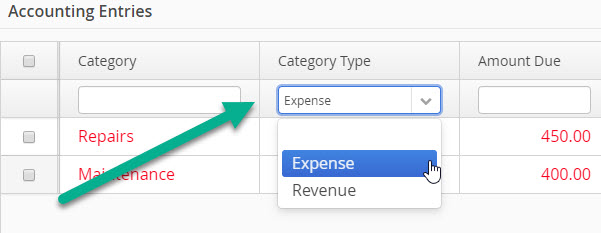
The main goal of this column is to allow you to filter the Accounting Entries to only show either Revenues or Expenses. The classic example is if you’re trying to find a discrepency in your expenses and need to look through your data. If you know the Category then it’s very easy to filter by Category but if you only know it’s an expense then in the past you would’ve needed to run one of the Expense reports to only see the Expense entries. Now with this new column you can filter the accounting data directly in the accounting table to just show expenses which makes it easier to scan for data entry errors.
Again by default this column is hidden so if you want to use it you will need to make it visible. It will first appear beside the Category column but just like all other columns you can adjust where it’s located in your table.
Tenant and Building/Unit Validation

Again if you do nothing then the software will continue to behave as if nothing has changed but we’ve now also added the ability to turn off a specific set of validation checks if you don’t want or need them. Specifically the validations to confirm that the Tenant and Building and/or Unit match up.
In other words if you select the Tenant (say for an Accounting entry) then the software checks that the Building and/or Unit selected matches up correctly and if it doesn’t it presents you with a confirmation popup to make sure this is what you want to do (as shown above). So for example let’s say you have a Tenant called John Smith that is setup to be living at 555 Main Street. If you create an Accounting Entry and you’ve selected the Tenant John Smith but you’ve selected a Building other than 555 Main Street (say 111 Brown Street) then the software will present you with the above popup notification asking you to confirm that you indeed want to keep the Tenant and Building/Unit (John Smith at 111 Brown Street) even if they don’t match up. There are scenarios where they will often not match up, and for these people turning off that check can be very beneficial.
The software does additional validation checks when you select just a Tenant and Building and/or Unit and these are all grouped under the same one setting. For example the software will automatically select the associated Building for you when you select the Tenant, and vice versa if you select the Building/Unit first (it will then select the Tenant for you). However if you select a Building and no Tenant when there is a Tenant assigned to that Building then the software will by default present you with a popup confirming that you want to proceed. This setting allows you to turn off that popup confirmation.
The popup confirmation is all to avoid and prevent data entry errors. It’s very easy if you’re going very fast to make accidental errors and the software has had these checks in place for over a decade now to prevent data entry errors. And even though it tries to assist you by autofilling the other (Building/Unit when you select a Tenant and vice versa) sometimes people do still override the software or edit previous entries, in which case these validation checks can save you from data entry error headaches. In the majority of cases you want this kind of validation check and confirmation. That being said in those scenarios where you don’t want it, generally where you select one and not the other (for example a Building and not the Tenant) then it can be fairly beneficial to be able to turn off these validation checks. It’s one of those features where almost everyone wants it on but for the small minority that want it off the benefit and value are very high.

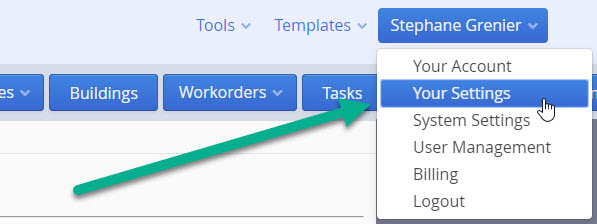
As a result we added a new Setting under “Your Settings” which can be found under your name on the top right corner under your name as shown above.

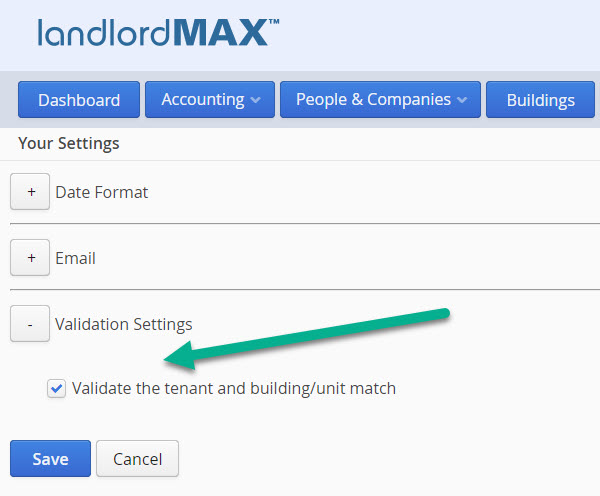
In the “Your Settings” options you will find a new section called Validation Settings with a single setting that allows you to enable or disable this validation confirmation check. In the above screenshot it’s show in Edit Mode (to get to the Edit mode click on the Edit button where the Save and Cancel would otherwise be located). If you turn off this setting then the software will no longer make validation checks between the Tenant and Building/Unit nor present you with any popup confirmations. It’s then up to you to make sure you selected the correct Tenant and Building/Unit combinations. Again the software automatically selects the Building/Unit when you select the Tenant, and vice versa, but if you make any manual edits afterwards, etc. just be aware that the software will no longer check and validate that the Tenant and Building/Unit match. Of course you can turn it all back on by enabling the setting.


