
Run your first report
Once you have gathered all the information, you want to be able to see what’s happening, when rents are due, which rents are late, how well your properties are doing, prepare for your taxes and so on.
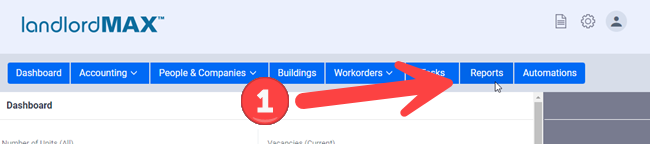
To get to the Reports section in the application  click on the Reports button in the top menu.
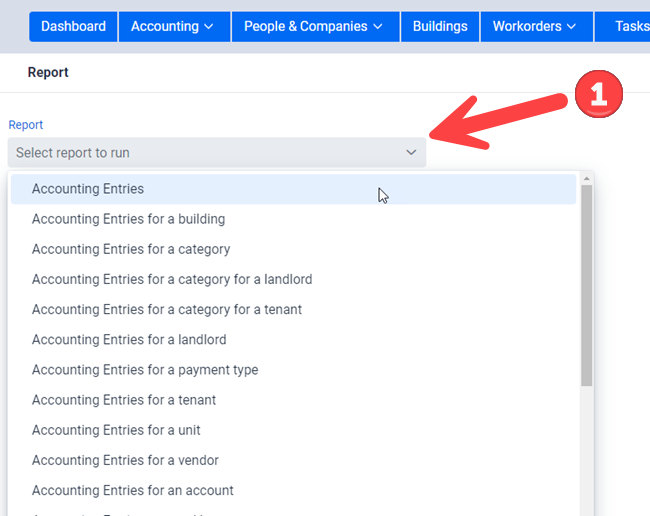
The first thing you’ll want to do is select which report you want to run by clicking on the “Select report to run” dropdown menu.
** Tip: Please note that you can also type in the report name and the software will automatically filter out only reports with that name. So for example if you only want reports that have the word “Tenant” in the report name then you can just type in Tenant and only reports such as “Accounting entries for a tenant” and so on will be included.
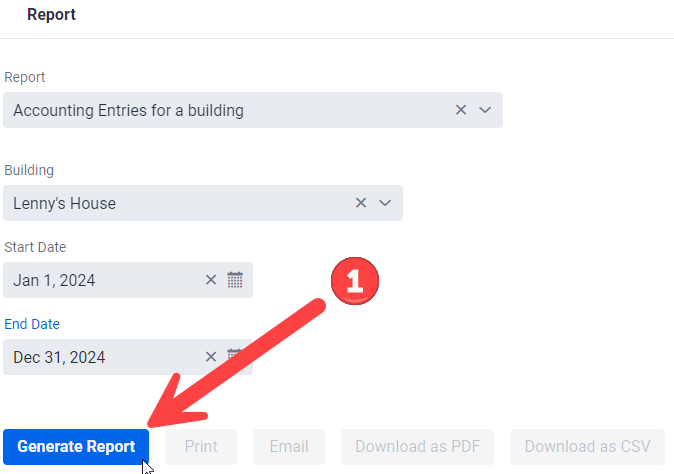
Once you select a report you will be presented with that reports specific fields. In the above screenshot the report “Accounting entries grouped for a building” was selected and therefore you are presented with the options to select the Building, as well as the Start and End Date for the Accounting Entries in the report.
Once you have entered in the values you want for report click on the Generate button to generate the report. It will then appear just below the buttons.
You can then Print, Email, or Download the report, depending on your needs. As well, all reports can be downloaded to PDF of CSV files.
By default there are approximately 150 different reports that come with the software but you can also create your own custom reports as well as customize any of the existing reports, meaning that the list of reports is completely up to you. Please note that customizing reports does require some html/css technical knowledge and that we also offer consulting services to help you create custom reports specific for you. You can find more details on report customizations in the Templating section of the user manual.
** IMPORTANT: Please note that the Start and/or End Date for the accounting reports provided by the software will only include accounting entries that have been paid (Date Paid) between those two dates (Start and End Dates). Otherwise if it also included entries for the Date Due then a rent for December 1st which was paid 45 days late (meaning it was paid in Jan of the following year), would then appear in the report and if you’re trying to run a yearly report for taxes then this revenue would be incorrect for the current year. Not to mention that it could appear for both years as it has dates in both years. The same is true for a corporation with a non-calendar fiscal year. Therefore the software uses only the Date Paid for accounting reports. You can of course customize this behavior by editing any of the existing reports or creating your own custom reports but we strongly advise against doing this, or if you are going to do it to be very careful when running those custom reports.
Extras
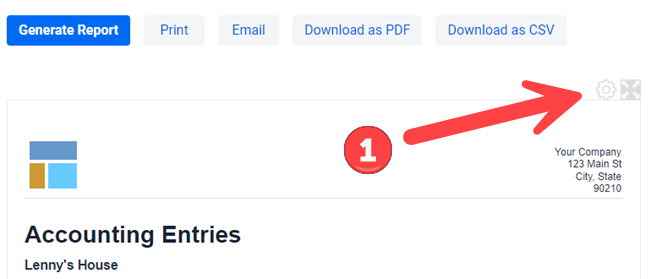
** TIP: Please note that you can both hide the charts in the reports as well as adjust the width of the report by clicking on the above buttons. The first allows you to hide/show the charts that were generated (which will be respected when printing). The second is to increase the width the report can use on the screen but it is NOT adhered to in printing as everything still has to fit on a standard sheet of printing paper. This is mostly for people who only want to run reports on their screens and/or have larger custom reports.