
Introduction
A big part of managing rental properties is running reports on the information, that is knowing how the properties are doing financially, what rents are late, what rents are coming due, when leases are up, and so on. This is especially important around tax season. The software offers approximately 150 different reports by default which you can find listed by clicking here. In addition to the provided reports you can create your own custom reports, as well as edit the existing reports. In other words the reporting system can be significantly expanded beyond the 150 reports already offered.
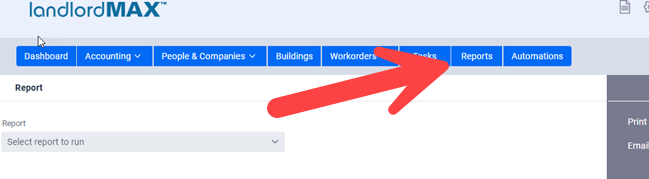
Select a Report
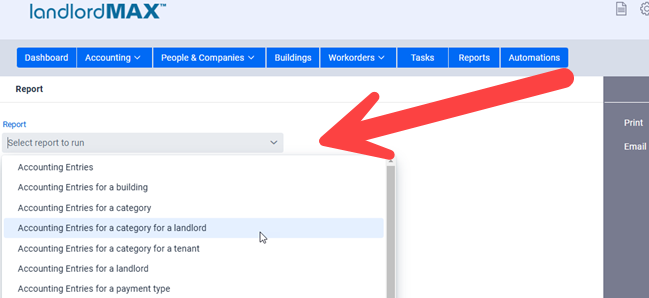
To run a report it’s as simple as selecting one from the list. If you have any custom reports they will also be included in the list of available reports. The reports are sorted alphabetically. Once you select a report the screen just below the selection will display the relevant fields for that report.
There are accounting reports, rent roll reports, vacancy reports, lease reports, late rent reports, expiring leases, P&L reports, and so on. There are even reports that are specifically designed to assist with tasks such as filling 1099 statements and so on. Again as stated above the default list of reports is approximately 150 at the time of this writing.
** TIP: You can type in the select field for the report which will in turn filter the list of available reports. In other words you can filter the list by typing. So for example if you type “for a landlord” then only reports that have “for a landlord” will be included in the list such as “Accounting Entries for a landlord”, “Accounting Entries for a category for a landlord” and so on. Similarly you can do this for say the “Rent Roll” reports if you only want to see the rent roll related reports.
Select the Report Details
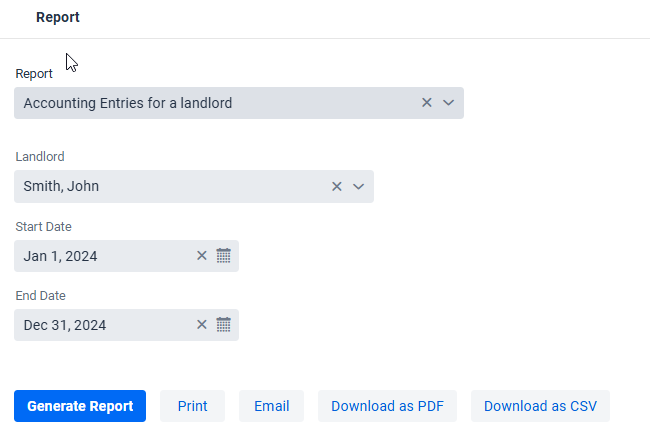
Once you’ve selected a report you will be presented with the report’s specific fields, which in the case of the above screenshot include the Landlord for the report as well as the Start Date and End Date for the report.
** NOTE: In the accounting reports the Start Date and End Date are matched up against the Date Paid. This is very important, especially when it comes to preparing your taxes. Therefore for example a rent for December 1st that was paid 45 days late, in January of the following year, needs to be reported as income in the year it was collected for tax and accounting purposes, and NOT the year it was due (doing so would be incorrect). Similar you don’t want that accounting entry to appear in both years either. The same is true for a corporation with a non-calendar fiscal year.
Generate the report
Once you have selected your constraints, press the Generate button to generate your report.
Print, Download, or Email the report
Once you’ve generated a report, you can then Print, Download, or Email the report depending on your needs. All reports can be downloaded as PDF or CSV (the later can be exported into Excel or Google Docs).
** TIP: The following applies ONLY to the CSV option. Although you can create custom reports for those who prefer the CSV file includes all the available information in the CSV and not just the columns displayed in the generated report allowing you to make your own customization in your choice of spreadsheet program (Excel or Google Docs) as well as run the generated data through custom programming scripts of your choosing. Please also note that the data is in raw format, meaning any niceties and formatting are not available in the CSV file format. The only real downside is that all the data is included in the CSV file format and may be more than what some people want, in which case you would have to remove the columns (data) you’re not interested in.
Report Settings and Preferences
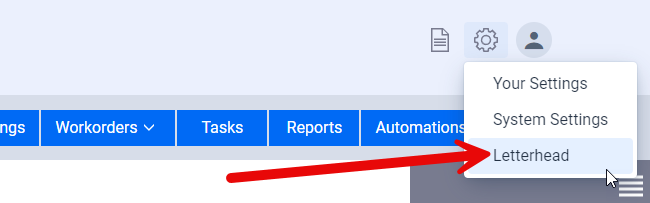
The letterhead displayed in the report is generated from the Letterhead settings. For more details on this we’ll refer you to the Letterhead section of the user manual which you can get to by clicking here.

In addition to adjusting the letterhead described just above you can also remove the chart from any report either by customizing the report, or if you just want to remove the chart right now you can use the gear clog to hide the chart as shown in the screenshot above. You can find more details on this in the Report Settings page by clicking here.
By default the report will display itself as best as possible to what it will appear on a printed sheet of paper, including limiting itself to the width of a standard sheet of printing paper. You can adjust the width so that the report uses all the available width on your monitor by clicking on the expand button (and vice versa to bring it back to the size of a standard printing page). Please note that this does NOT change the width on the printed sheet of paper, it only changes the width on the screen. The reason being is that all reports need to fit on a standard sheets of printing paper. This feature tends to be more useful to people who either don’t print any reports and just want to see things on the screen, or that have much more complex and large reports that as a side note tend to not fit on a standard sheet of printing paper. In either case the option is there for you should you want to expand the report on the screen. You can find more details about this as well on in the Report Settings page by clicking here.