
Introduction and video
Scheduled Accounting Entries are how you define your recurring transactions such as rents, utility bills, mortgage payments, and so on. If you have just a single one time Accounting Entry (transaction) such as fixing a toilet then you would just create a single Accounting Entry. Scheduled Accounting Entries are only for recurring transactions, from revenues for rents to expenses like utilities and so on. Generally the amount is fixed but entries with changing amounts can also be scheduled where you just enter in the amount on the recurring cycle (week, month, etc.).
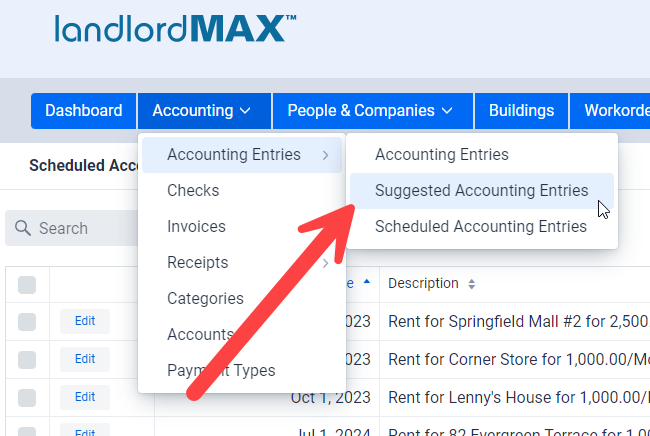
The Accounting Entries Section is divided into 3 parts.
- Accounting Entries — The list of all your transactions (Accounting Entries).
- Suggested Accounting Entries — The list of entries that have been generated for you that are waiting your approval before going into the main Accounting Entries table
- Scheduled Accounting Entries— The list of definitions for your recurring Accounting Entries.
For recurring entries you first define the Scheduled Accounting Entry, that is to say when it will recur. So for example if you have a rent that’s due on the 1st of each month then you would first create a Scheduled Accounting Entry to say that you want a rent due every month on the 1st. The software will then generate Suggested Accounting Entries for you based on the Scheduled Entries for you to approve to the main accounting table.
** IMPORTANT: The best way to view the Suggested Accounting Entries is as a placeholder before they are put in the main Accounting Entries table so that you have a chance to approve and/or edit them. A classic example of why you want an intermediate placeholder is for late rents by tenants, or even worse unpaid rents. Although the rent may be due on the May 1st it may not be paid on the May 1st but maybe May 2nd, 3rd, 4th, and so on. By putting them in a placeholder for your approval (Suggested Accounting Entries) you can then confirm and approve which rents are paid and on what date.
** IMPORTANT: By default the software will create Scheduled Accounting Entries for your rents based on your Lease entries. It is very important to note that the Scheduled Entry is created when you first save your Lease. It is NOT updated when you edit the Lease as this can lead to all kind of unexpected complications. In this case you will need to then edit the associated Scheduled Entries.
Schedule the Entry
There are two ways to create Scheduled Accounting Entries (not counting the software automatically creating them for you through the Leases). The first is to go to the Scheduled Accounting Entries section and manually create a Scheduled Accounting Entry. The second option is to Scheduled an entry from the main accounting table by clicking on the Schedule option in the right menu or through the right click popup menu on the table.
We’re mainly going to create them manually in this section as the Schedule option in the right menu in the main accounting section is virtually the same except that it only shows the scheduling data, the rest is taken from the selected Accounting Entry itself.
** IMPORTANT: Please note, that as mentioned above, that by default the software will create all the rent Scheduled Accounting Entries for you based on the Leases you enter saving you the effort of creating them for all your rents.
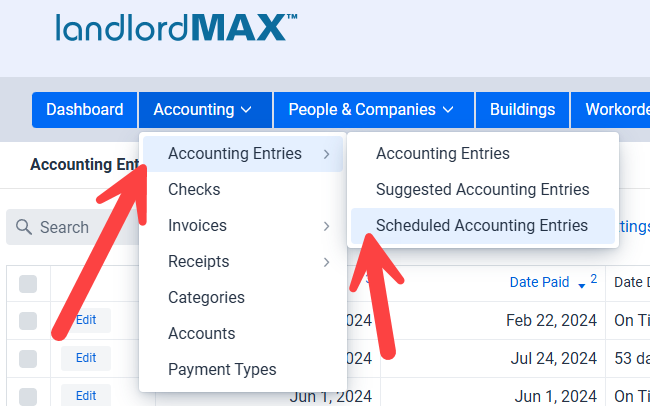
The first step is to create the Scheduled Accounting Entries for the recurring transactions. To do this  go to the Scheduled Accounting Entries option in the Accounting menu. On this screen
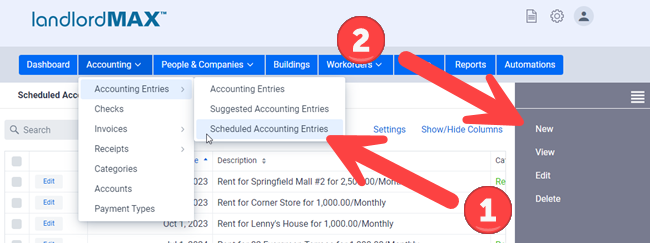
 ![]() click on the New option to create a new Scheduled Accounting Entry. Again alternatively you can select an existing Accounting Entry and click on the Schedule menu option on the right side if you’ve already entered in the data and want to save some data entry effort.
click on the New option to create a new Scheduled Accounting Entry. Again alternatively you can select an existing Accounting Entry and click on the Schedule menu option on the right side if you’ve already entered in the data and want to save some data entry effort.
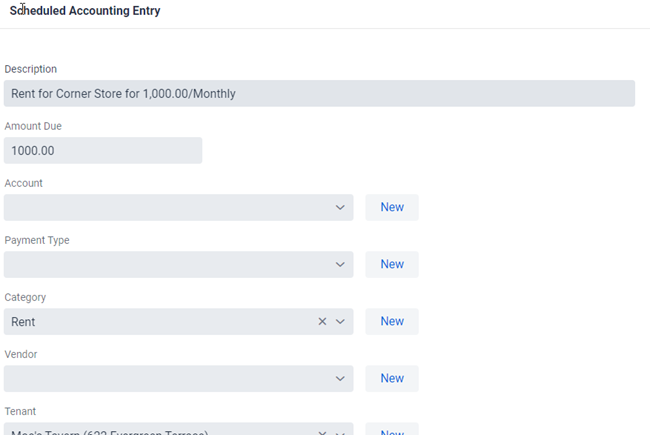
The new Scheduled Accounting Entry form can be divided up into two logical sections. The top section is where you enter in the accounting data such as the amount, the description and so on with the bottom being the scheduling details.
** TIP: Keep in mind that not only are all fields optional but that you can edit the entry as part of the approved process meaning if the amount changes such as some utility bills you can leave the Amount Due field empty and just fill it in each month. The same can be said for the Payment Method. So for example if it’s a rent and the tenant generally pays by check then set the Payment Method to be check and should they decide one time to pay by Cash then you can just edit the Payment Method for that entry.
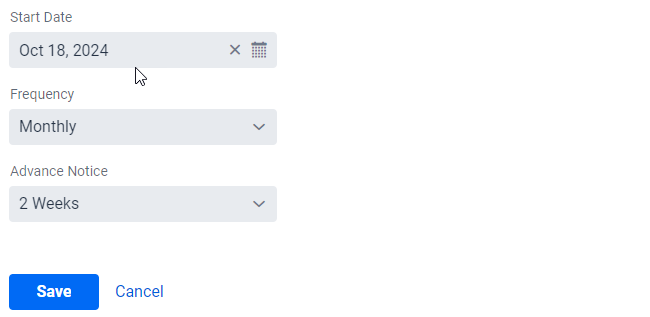
The bottom portion of the form is where you schedule when the Accounting Entry will recur. That is to say when the Suggested Accounting Entry are created for you to approve. Specifically you need to set three values:
- Start Date – The date on which the first recurring Accounting Entry will be created.
- Frequency – How often the recurring Accounting Entry will recur.
- Advance Notice – How far ahead of time you want the recurring entry to be created.
So for example if you create a Scheduled Accounting Entry with a Start Date of Oct 1, 2024, with a Frequency of 1 month, and an Advance Notice of 2 weeks then the software will create the first Suggested Accounting Entry for you to approve for Oct 1, 2024 two weeks BEFORE it’s due (2 week Advance Notice). Meaning it will be created on Sep 18, 2024 (2 weeks before Oct 1, 2024). It will be marked as due and paid on Oct 1, 2024 but of course this requires your approval as the actual Date Paid and so on can be very different. It just defaults to the date it’s due to save you some data entry as most entries should hopefully be paid on time. You can then either accept the Suggested Entry as is or modify it as needed before accepting it.
Then the next month the software will again create another Suggested Accounting Entry for Nov 1, 2024 two weeks ahead of time on Oct 18, 2024 (again 2 week Advance Notice) for you to approve or modify before accepting.
** IMPORTANT: The software will continue to create Suggested Accounting Entries for you until the Scheduled Accounting Entry is deleted. This is true even if the entry was created from a Lease as a lot of people transition from Lease to monthly rents and the last thing we want is for someone to forget to create a new Scheduled Entry and potentially miss any rents.
** IMPORTANT: Although you can modify almost any value in the software it is NOT possible to modify the scheduling values in the Scheduled Accounting Entries due to all the possible scheduling and data conflicts. Therefore if you need to edit the scheduling values for the Scheduled Accounting Entries you will need to delete the existing Scheduled Accounting Entry and then create a new Scheduled Accounting Entry.
Approve the Entry
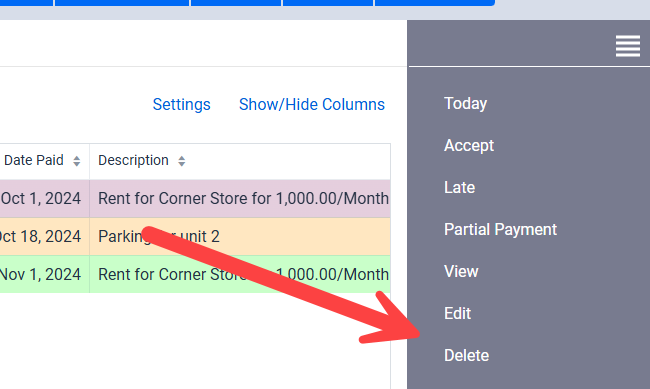
As described in the section above once you have created a Scheduled Accounting Entry the software will then generate Suggested Accounting Entries for you to approve. This staging area is called the Suggested Accounting Entries. You can view the list of Suggested Accounting Entries for you to approve by going to the Suggested Accounting Entries table as shown above.
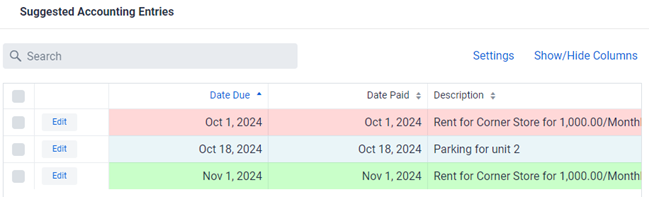
The Suggested Accounting Entries table as shown above lists all the Suggested Accounting Entries waiting for your approval. In the example above there are three Suggested Accounting Entries waiting for approval. The first one is red meaning that it is currently late. The second is blue meaning that it due now (today). And the last one is green meaning that is not yet due but is coming due soon. You can change the Accounting Color Codes to be different colors and as well as how late or early each color signifies.
By default the Suggested Accounting Entries are sorted by the most outstanding to the least outstanding but similarly you can also adjust which columns appear, in what order they appear, as well as the sorting order to match your personal preferences.
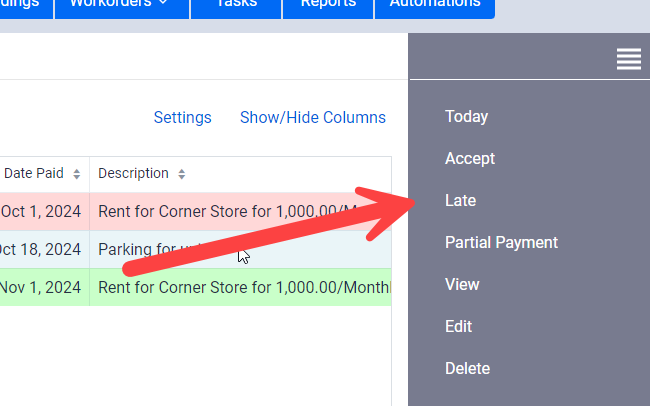
You have several options on how to approve and process the entry using the different menu items as well as edit the Suggested Accounting Entry directly in the table. Each option is covered in its own sub-section.
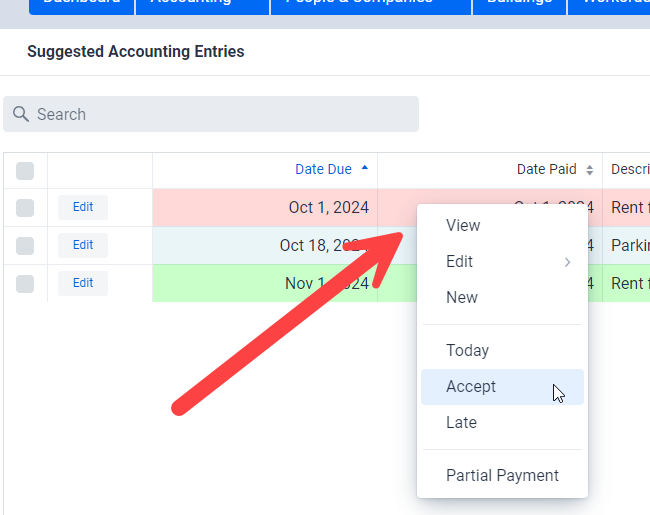
In addition to the menu on the right you can also right click on an entry in the table to directly process on the spot.
** IMPORTANT: The right click menu only applies to the entry you clicked, that is the entry on which the mouse was located when you clicked. It does NOT apply to the selected entries that were selected using the left column in the above screenshot. For that you need to use the right menu instead of the right click menu.
Edit the Entry in the Table

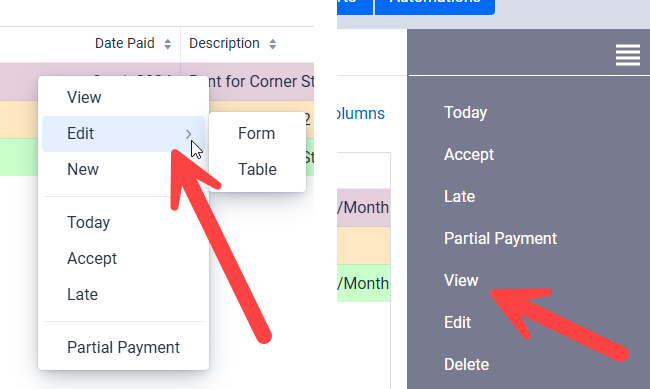
The quickest way to Accept an entry is the right click menu shown in the screenshot in the previous section but after that the next quickest way is to edit the entry directly in the table and then approve it. To do this click on the Edit button in the appropriate column and then ![]() select Table from the popup menu to edit the entry directly in the table. The Form option is the same as the Edit button in the right menu and will bring you to the form view of the entry. The main difference is that with one you can edit directly in the table but may be limited to the columns on the screens whereas the other one is to the form view which allows you to edit everything.
select Table from the popup menu to edit the entry directly in the table. The Form option is the same as the Edit button in the right menu and will bring you to the form view of the entry. The main difference is that with one you can edit directly in the table but may be limited to the columns on the screens whereas the other one is to the form view which allows you to edit everything.

Once you’ve made the changes you’d like to make, for example changing the Date Paid, you can then click on the Save button for the row. This Save button is the same as doing an edit and then save action in the right menu, just in one step. In other words clicking the Save button will approve the entry as you’ve edited and move it from the Suggested Entries Accounting table to the main Accounting Entries table.
** TIP: If you have a lot of edits to make, or more involved edits, then it may be better to select the Suggested Accounting Entry from the table and then edit it so that you can see the full form and make all the edits you want to do. This option is more for quick edits such as adjusting the Date Paid, Payment Type, and so on.
Please note that some fields are NOT editable from the table directly such as the Notes field (in the case of the Notes field it is because it can span over many lines and as such it’s not really feasible to edit paragraphs of text directly in a row in a table.
Today
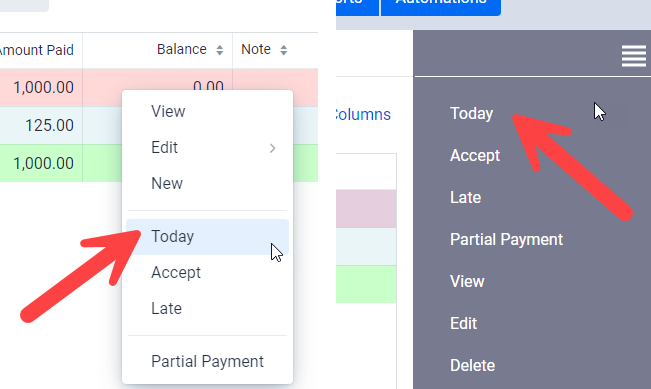
The first option is to click on the Today action which will only modify the Date Paid to today’s date. We generally recommend processing your transactions as they are paid so that you can just click on the Today action that day and have the software automatically adjust the Date Paid values to today’s date for you. This saves you the effort of having to manually edit the entries to adjust the date. If you do them one at a time the right click menu may be the easiest option. If you want to select a number all at the same time then the right menu option may be quicker. In either case the Today option is the quickest and easiest way to process Suggested Accounting Entries assuming you process them on the dates the payments are received..
Accept
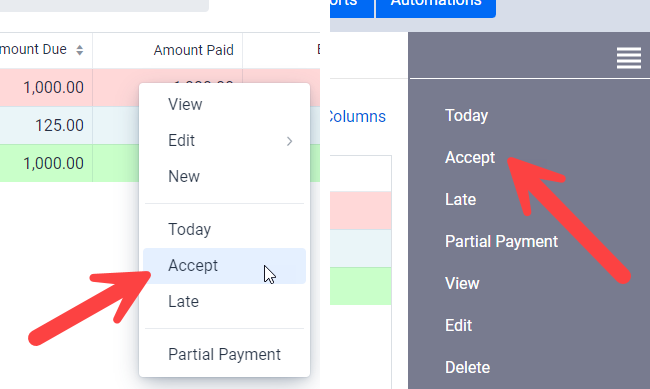
The Accept action will simply approve and accept the Suggested Accounting Entry as is and without any modifications. This is generally used when the transaction is paid or received in full on the date that it was due.
Late
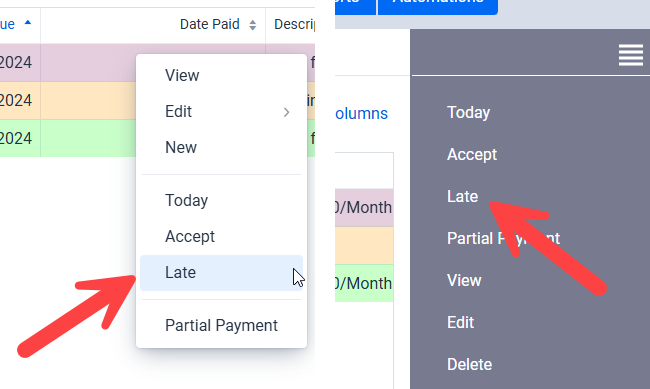
The Late action is used to processed Suggested Accounting Entries that are outstanding AND still due. The action empties the Date Paid and Amount Paid from the selected Suggested Accounting Entries. In other words it processes and approves them but first marks them as unpaid.
** TIP: We generally recommend processing the Suggested Accounting Entries as the payments are received/paid, and then once your grace period is over to select all the remaining Suggested Accounting Entries and process them all as Late in one step. The main benefit of doing it this way is that you can clean up all your remaining and outstanding Suggested Accounting Entries in one step. As well once they are marked as Late they will then appear in the Late payment reports as well as the Tenant Statement reports as outstanding balances owed, as well as appear in any other relevant accounting report you may want to run.
** TIP: Suggested Accounting Entries are NOT included in any of the Accounting reports as they have not yet been approved. It’s only when they are promoted to the main Accounting Entries table that they will be included in the accounting reports.
Assuming you are using the default sorting order in the main Accounting Entries table you will see all the outstanding and unpaid Accounting Entries at the top of the Accounting Entries table before the paid entries as you most likely want to deal with them first. If an entry is never going to be paid, that is for example a Tenant will never pay their rent, then you can mark the entry as Excluded. This allows you to keep the entry in the system but at the same time exclude it from all the accounting reports and so on.
Partial Payment
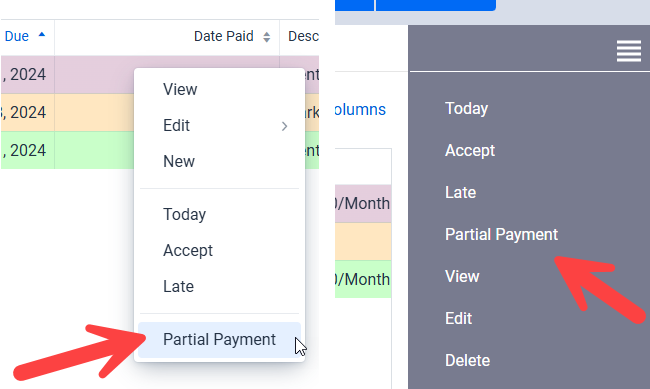
The Partial Payment action allows you to apply a partial payment to the Suggested Accounting Entry. Specifically the partial amount paid, the date it was paid, and so on are entered in a popup window which appears after you click on the Partial Payment action. The software breaks up the existing Suggested Accounting Entry into a new Accounting Entry for the portion that was paid and edits the existing Suggested Accounting Entry to reflect the amount still remaining. In other words the partial payment will appear as a new Accounting Entry in the main accounting table for the amount paid, and the existing Suggested Accounting Entry will be edited to remove the amount paid so that it now shows only the amount remaining that is due.
View and Edit
The View and Edit actions are as described. The View action lets you view the Suggested Accounting Entry whereas the Edit action allows you to edit the entry directly before accepting/approving it. Normally the Edit action is used, with the most common edit being the Date Paid. On the popup menu you have the option to edit the entry in the form view or directly in the table. You can also use the Edit button in the left column to edit the entry directly in the table.
** IMPORTANT: Saving a Suggested Entry is the same as approving the entry after it’s been edited. That is to say it will apply the changes you’ve just made and approve the entry as an Accounting Entry with the edits you just made. In other words it’s more like a Save and Approve then just a Save action.
** TIP: To save a lot of data entry it is recommended to process the Suggested Entries on the dates you actually receive things like rents because you can then just select them and click on the Today option which will automatically adjust the date to today’s date. This saves you the extra clicks of having to edit the entry, change the date to the appropriate date, and then save them. It saves you a few clicks, which if you have a lot of tenants and rents can save you a decent amount of clicks every month.
Delete
The Delete action is used to delete the selected Suggested Accounting Entries. That is to say you do not approve it and want it removed from the system.
Please note that the Delete option is only available in the right menu, it is not available in the popup menu when you right click on an entry in the table. This is intentional to avoid any accidental mistakes. Even though the software requires a confirmation when deleting, the delete is nonetheless removed from the popup menu as to avoid accidental errors.
** IMPORTANT: If a Suggested Accounting Entry keeps appearing even after you delete it then this means you still have the associated Scheduled Accounting Entry to delete. Suggested Accounting Entries are generated from the Scheduled Accounting Entries so if you are still seeing the same Suggested Accounting Entries being created then this means you have not yet deleted the associated Scheduled Accounting Entry that is responsible for creating the Suggested Accounting Entry.