
Create a lease
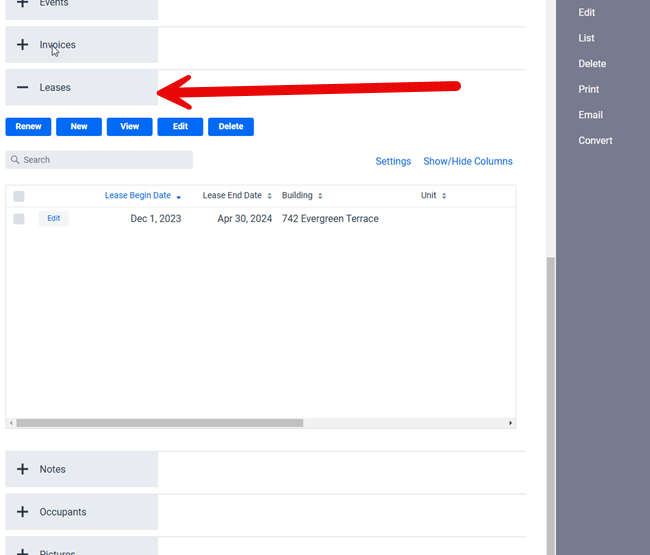
Leases can be found in the Tenant section of the software in the Tenant’s screen, under the Leases SubPanel as shown above. You can find more details on how to access the Tenants section of the software by clicking here. Leases are used to help you manage your rentals, can be used to automatically create recurring entries for you through the use of Scheduled Accounting Entries, Invoices, and Receipts, as well as generate the Expiring Lease and Rent Roll reports and so on.
Enter recurrent rent payment and lease information
Each time you create a lease, a Scheduled Accounting Entry, as well as a Scheduled Invoice and Receipt by default are automatically created for you based on the Lease information at the Frequency you specified in the lease (monthly for monthly rents, and so on).
**IMPORTANT: Please note that the Scheduled Entries are ONLY created when you first save the Leases. If you later edit the Lease the Scheduled Entries will not be edited, this has to be done manually for safety reasons. This is intentionally done as doing so can lead to all kinds of complications and unexpected results (including possible overlapping, duplicating, or missing rents and so on). Therefore if you need to edit a Lease you should also then edit the associated Scheduled Entries. If you are editing the scheduling portion of the Lease then please note that you will have to delete the associated Scheduled Entries and manually re-create them, for the same reasons. You can also find more details about this in the Scheduled Accounting Entries section of the user manual.
Getting back to Leases and Scheduled Entries, the Scheduled Entries will in turn will create Suggested Entries at the appropriate times with pre-defined Advance Notice for you to process and approve to the main accounting table (see creating a scheduled entry in accounting for more details).
**IMPORTANT: When a Tenant moves out or their status changes from Current to a non-Current status, you will also have to delete the Scheduled Entries. Although creating a Lease automatically creates Scheduled Entries, again for you they are not linked because of several reasons. For example the rent can be paid late, rents can be paid after a lease is completed, etc. As well some Tenants will transition to a month to month rent without a Lease, and therefore some people prefer to just keep the Scheduled Entries around rather than having to re-enter a new one manually. Similarly for the Status a Tenant may not have moved in yet but you want their first rent to be automatically generated ahead of time (the Advance Notice), or they may have left but still have time left on their lease (for example a tenant that is no longer living there but still has some time left on the lease, or a parent leasing a unit for their college kid during the summer).
Renewing a lease
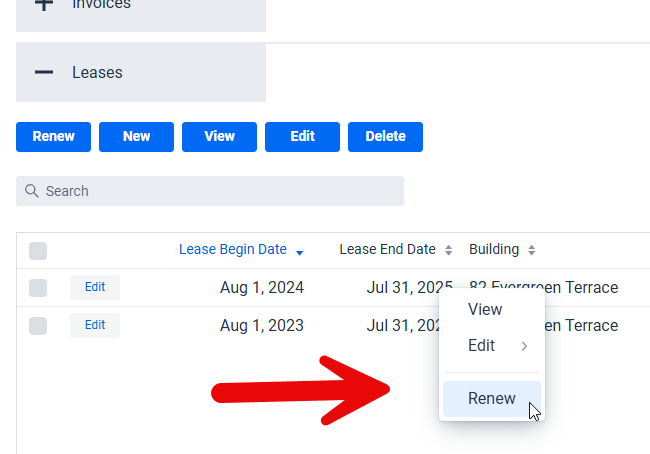
The simplest way to renew a lease is to select one of two Renew options in the Leases table, with the simplest being to just right-click on the lease you want to renew in the table, which will cause the above popup menu to appear where you can select the Renew option directly.
You can select to manually renew a Lease but we generally recommend using this method because it’s much quicker and easier. The dialog will also update the existing scheduled entries for you saving that additional step if you decide to do everything manually.
** IMPORTANT: Please note a Lease End Date is required to Renew a Lease otherwise it is considered a month to month Lease in which case renewing is nonsensical. If you have such a Lease and still want to Renew it then you can just add a Lease End Date to the Lease before selecting the Renew option, such as today’s date or whatever date is most appropriate.
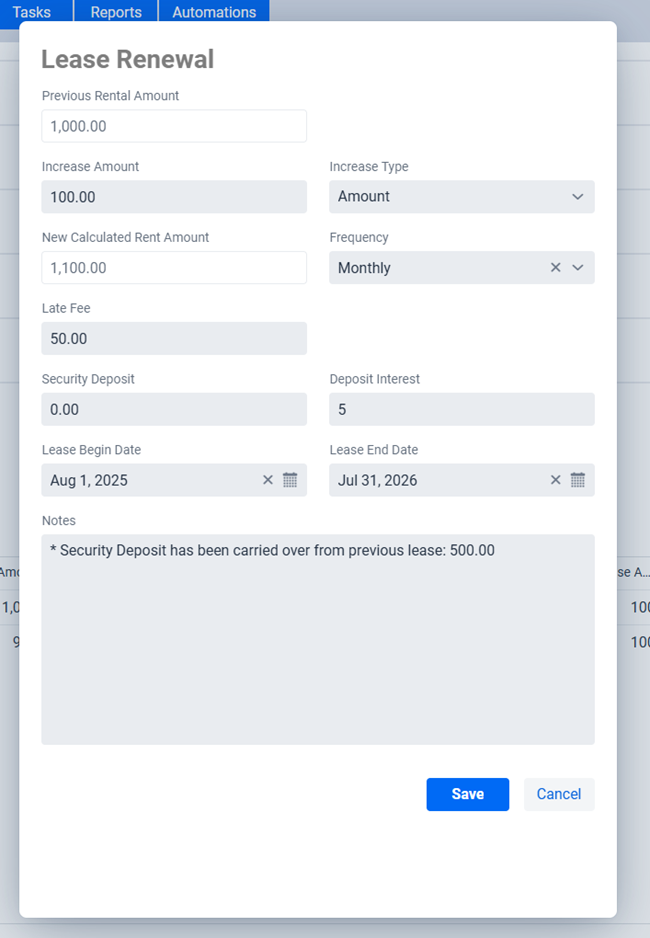
The Renew action will bring up the popup dialog in the above screenshot. The software will prefill the values as much as possible from the available information from the Lease you selected to Renew but you can of course change them to whatever is appropriate.
** IMPORTANT: It is important to confirm the Lease Begin Date and Lease End Date, especially for Pro Rated Leases. The software will try to automatically renew the Lease for the same length of time as the previous Lease but if it was pro-rated then there are chances that these values will need to be adjusted.
** IMPORTANT: If there is a Security Deposit than the Security Deposit in the new Lease will be empty and instead a comment will be added to the Notes section indicating that the Security Deposit has been carried forward from a previous Lease (the comment will include the carry forward amount). This is done so that it doesn’t appear as though there is a new Security Deposit every time a Lease is renewed, and instead the Security Deposit is tied to the original Lease. If you wish to change this behavior then you can absolutely go ahead and edit the Security Deposit to it’s Amount and delete the comment in the Notes section.
As previously mentioned the dialog will also look at all the relevant Scheduled Entries, specifically the Scheduled Accounting Entries, the Scheduled Invoices, and Scheduled Receipts, looking for previously created entries that match the old Lease and update them to the new Lease as part of the renewal process. Upon completing the Lease Renewal process the software will indicate if any, and if so, which type of Scheduled Entries were updated in a notification dialog.
** TIP: The software locates the Scheduled Entries by matching a number of criteria, meaning if you’ve changed those values on the Scheduled Accounting Entry then the software will not be match them as the amounts are different in which case you would then have to manually update that Scheduled Accounting Entry. This is exactly the behavior you want, after all you wouldn’t want it to update Scheduled Entries if the values such as the rent amount aren’t matching.
**TIP: If the Tenant is transitioning to a month to month Lease, then the easiest way is to just leave the Lease End Date blank when renewing the Lease.
Increasing the rent
There are several ways to increase the rent of a lease.
In most cases, rental increases occur when leases are renewed, which means you can just create a new Lease through the Renew feature of the software as described in the section above. If this is not the case and the rent is increase midway through a lease, then the recommend solution is to break the Lease up into two separate Leases, one for each part of the rental amount. If you want to use the Lease Renew feature in the previous section then you can edit the Lease End Date before using the Renew feature.
If the tenant is renting on a month to month basis, it is likewise recommended that you end the previous month to month Lease and create a new Lease with the new rental amount. The biggest advantage of doing this is that you retain an accurate record of exactly what rental amount was paid when, should you ever need this information.
Additionally, you may also go under the “Leases” edit Rent Increase values at any time. You can choose between a percentage increase or flat amount.
Pro-rated rent
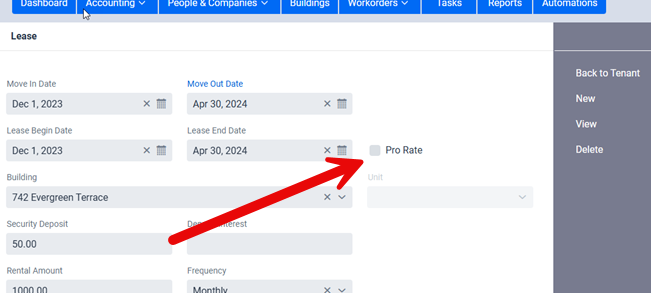
If you select the Pro Rated option for the Lease the software will then automatically adjust the Scheduled Entries for you (Scheduled Accounting Entries, Invoices, and Receipts) based on the Lease information so that everything is Pro Rated for the first rent. This includes creating the first Pro Rated rent as Suggested Entries and all other rents being created through the normal Scheduled Entries process. The calculations are all based on the rent amount and the number of days the rent is Pro Rated for. Should you have a different calculation you can manually override the entries the software created for you.
So for example if you create a monthly Lease starting on the 11th and Pro Rated it then the first month would be the 11th to the end of the month and all rents after would be scheduled for the 1st of the month. If however you created the Lease and didn’t select Pro Rated then that means the rents are all due on the 11th. If you meant to create set the Lease as Pro Rated then you will just need to edit the Scheduled Entry(s) and manually re-create them for the 1st (and vice versa if you accidentally selected Pro Rated when you meant for the Lease not to be Pro Rated).
** IMPORTANT: Please note that using the Pro Rated feature means that the Lease Renewal feature will most likely require some manual adjusting to the Lease Begin Date and/or Lease End Date depending on the details because the software uses the length of the current Lease as the basis for determining the length of the next Lease.
Late fees
The software offers the ability to set a fixed Late Fee for automatic late fee calculations in the Accounting system (see Creating a Scheduled Entry in the Accounting chapter for more details). In essence when you click on the Late Fee option in the Accounting section the software is smart enough to find the appropriate Lease entry and use the Late Fee you set in the Lease to automatically create a new Late Fee based Accounting Entry for you.